Usually, when you insert an external SSD into the USB port of your Mac machine, the external SSD will be detected, recognized, and mounted on the Mac desktop soon. But sometimes, you can’t find the inserted external SSD show up, making it impossible for you to access the stored files on the external SSD.
The situation could be terrible especially when you plan to view a working document and share it with other colleagues only to find that you have lost access to the drive. What’s worse, all the vital files stored on the drive may get lost if external SSD not recognized on Mac results from drive corruption.
Just calm down if you are experiencing the same situation! The irritating problem can be handled after taking some effective measures mentioned in the article. Let’s move forward to find these straightforward solutions!
Why the External SSD Not Recognized Issue Occur?
Many possible factors can cause your external SSD to not show up or be recognized on Mac. Here, we concluded a list of probable causes:
- You are using a malfunctioned SATA to USB 3.0 adapter or Dock.
- Your Mac can’t recognize the file system of the external SSD.
- The external SSD goes corrupt.
- The external SSD is not set up to show up in Finder Preferences.
- You just purchase a new external SSD and don’t initialize it.
- Some hardware errors happen to the external SSD.
How to Fix External SSD Not Recognized on Mac? (Three Workable Methods)
Method 1 Confirm If the External SSD Has a Connection Issue
To make sure that your drive is well-connected to your Mac, here are some simple checks you should go through:
- Connect your SSD to the Mac with a different cable, which helps to verify if the original cable is working.
- Plug in your SSD to a different drive using a healthy SATA to USB adapter, which enables you to know if the root cause comes from the adapter.
- Ensure your drive is compatible with the adapter, dock, or case by checking if the SSD is using SATA Ⅰ, Ⅱ, or Ⅲ.
Method 2 Make Use of the First Aid Function in Disk Utility to Check and Repair the Unrecognized External SSD
First Aid in Disk Utility is a practical function supporting checking and repairing disk errors. If the external SSD can show up in Disk Utility but fails to be mounted, just use the Mount option provided in Disk Utility to mount the drive. After that, your SSD can be mountable on your Mac machine. However, if the SSD doesn’t succeed in being mounted in this way because the Mount option appears to be gray, then you should run First Aid to check and repair the SSD.
Step 1 From the Mac Dock, find and click Launchpad. Then choose Other > Disk Utility to open the Disk Utility program.
Step 2 Locate the unrecognized external SSD and select it from the left panel.
Step 3 From the top toolbar listed in the Disk Utility window, click the First Aid menu. At this time, your drive will go through the diagnosis and repair process. Once it is complete, just click Done to see if your problematic SSD can be recognized and show up on Mac normally.

Method 3 Recover Data from the Unrecognized External SSD and then Reformat the Drive
After trying a series of possible fixes, the external SSD is still unrecognizable on Mac, which indicates your SSD may go corrupt for some logical errors. Under this circumstance, reformatting the drive will be a good solution.
It is certain and inevitable that either SSD drive reformatting or disk corruption will cause your important files to be lost if you’ve never backed up the SSD files. Thus, you must take some effective measures to retrieve your data first before proceeding with drive erasure.
If you have backed up all the stored files before, you don’t need to worry about the data loss issue, but if you have never thought of data backup, what should you do? Just take it easy! Here, we will recommend a top-class data recovery tool named iBoysoft Data Recovery for Mac to get you out of the trouble. To get your lost files back from the unrecognized, unmounted, or corrupted external SSD, you should take the steps mentioned below:
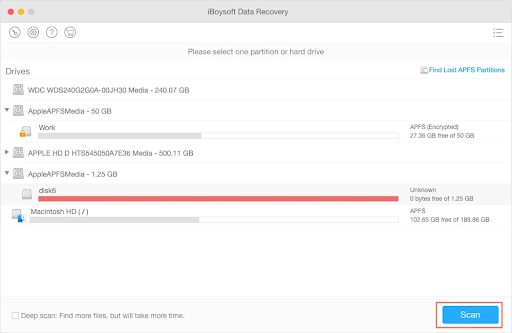
Step 1 Launch iBoysoft Data Recovery for Mac after downloading and installing it on your Mac.
Step 2 Find and select the unrecognized external SSD from the software interface, and then click Scan.
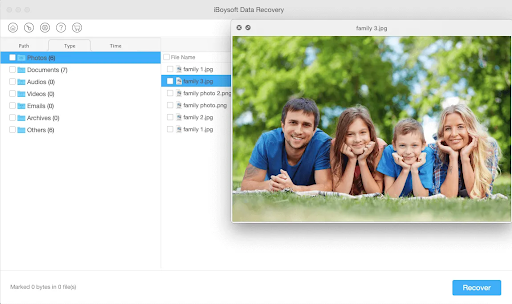
Step 3 Preview the files you have searched to find out the files you are eager to recover, tick the check boxes before the wanted files and click Recover to get them back from the unrecognized external SSD.
After data retrieval, reformat the SSD drive by taking the below-mentioned tutorial:
Step 1 Run Disk Utility by navigating to Launchpad > Other > Disk Utility.
Step 2 Pick the unrecognized SSD from all listed drives in the left sidebar.
Step 3 Click the Erase option from the toolbar presented in the Disk Utility window.
Step 4 Fill in the necessary details (Name, Format, and Scheme) in the pop-up window and hit Erase to perform drive reformatting.
Conclusion
This article elaborates on three different methods to help you deal with the external SSD not recognized on Mac issue. Try them out when your external SSD is not recognized or showing up on Mac. Also, when you need to conduct Mac data recovery from your unrecognized, unmountable, or corrupted external SSD drives during carrying out problem-solving methods, consider iBoysoft Data Recovery for Mac the best choice.